728x90
반응형
728x90
반응형

public static void main(String[] args) {
double a = 3.14; // 실수형 변수 a에 3.14저장
double b = 5.15; // 실수형 변수 b에 5.15저장
System.out.println(a==b);
System.out.println(a!=b);


String c1 = "hello JAVA!"; //c1 문자열 변수에 "hello JAVA!" 값 저장
System.out.println(c1 == "hello JAVA!"); // true
System.out.println(c1.equals("hello JAVA!")); // true (문자열 비교할 떄는 equals사용)
// 문자열.equals(비교 문자열) : 문자열 비교하기
System.out.println(c1.equals("hello java!")); // 대/소문자 까지 비교

728x90
반응형

'코딩일지 > Java' 카테고리의 다른 글

연산자  (2) 2023.01.08
변수  (0) 2022.12.15
데이터 타입과 형변환  (0) 2022.12.15
스캔(값 입력받기)  (0) 2022.12.15
프린트 및 문자형태  (0) 2022.12.14
728x90
반응형
<!doctype html>
<html lang="en">
<head>
    <meta charset="UTF-8">
    <meta name="viewport"
          content="width=device-width, user-scalable=no, initial-scale=1.0, maximum-scale=1.0, minimum-scale=1.0">
    <meta http-equiv="X-UA-Compatible" content="ie=edge">
    <title>Document</title>
</head>
<body>
    <textarea name="txt" id="txt" cols="30" rows="20"></textarea><br/>
    <label for="text-color">글자색 변경</label>
    <input type="color" id="text-color" value="#FFF"><br />

    <label for="bg-color">배경색 변경</label>
    <input type="color" id="bg-color" value="#FFF"><br />

    <button id="set-color">설정 저장하기</button>
    <button id="get-color">설정 불러오기</button>
    <button id="clear">설정 초기화</button>
</body>
</html>


    <script>

        const textArea = document.getElementById('txt');
        const textColor = document.getElementById('text-color');
        const bgColor = document.getElementById('bg-color');
        const setBtn = document.getElementById('set-color');
        const getBtn = document.getElementById('get-color');
        const clearBtn = document.getElementById('clear');


        // 글자색 변경 부분이 색이 ㅂ녀경되었다면
        textColor.onchange = () => {
            // 텍스트 에리아의 색을 변경
            textArea.style.color = textColor.value;
        };
        // 배경색 변경 부분의 색이 변경되었다면
        bgColor.onchange = () => {
            // 텍스트 에리어의 배경을 변경
            textArea.style.backgroundColor = bgColor.value;
        };

        setBtn.onclick= () => {
            // color 값들을 모두 받아서 객체 형태로 저장함
            const colorObj = {txtColor:textColor.value, bgColor:bgColor.value};
            const jsonObj = JSON.stringify(colorObj);
            console.log(jsonObj);
            // 로컬스토리지에 현재 textColor의 값을 'txtColor' key 이름으로 저장함
            localStorage.setItem("textAreaColor", jsonObj);
            alert('설정을 저장했습니다!');

        }
        getBtn.onclick= () => {
            alert('설정을 불러왔습니다!');
            const textAreaColor = JSON.parse(localStorage.getItem('textAreaColor'));
            // 텍스트 에리어 값을 변경
            textArea.style.color = textAreaColor.txtColor;
            textArea.style.backgroundColor = textAreaColor.bgColor;
            // 색상 input값을 변경
            textColor.value = textAreaColor.txtColor;
            bgColor.value = textAreaColor.bgColor;
        }

        clearBtn.onclick= () => {
            let length = localStorage.length;
            while(length > 0){
                localStorage.removeItem(localStorage.key(0));
                length--;
            }
            alert('설정 정보를 삭제하였습니다.');
        }


    </script>

실행 창

728x90
반응형
728x90
반응형
<!DOCTYPE html>
<html lang="ko">
<head>
    <meta charset="UTF-8">
    <meta http-equiv="X-UA-Compatible" content="IE=edge">
    <meta name="viewport" content="width=device-width, initial-scale=1.0">
    <title>Document</title>
</head>
<body>
    
</body>
</html>
<script>
    // promise : 비동기 처리를 위해 ES6부터 지원되는 비동기 함수
    // promise 생성자 함수는 비동기 처리를 수행할 콜백 함수(executor 함수)를 인수로 전달받음
    // executor는 resolve, reject라는 두 개의 함수르 인수로 전달받음
    // promise는 생성되는 순간 바로 executor 를 실행함(중요!)
    // promise는 실행이 끝난 promise 객체를 반환함
    // Promis 상태 -
    // 1) prnding : 비동기 처리가 아직 수행되징 않은 상태로, 프로미스 생성 직후 상태
    // 2) fulfiled : 비동기 처리가 수행된 상태(성공)로, resolve가 호출된 상태
    // 3) rejected : 비동기 처리가 수행된 상태(실패)로 , reject가 호출도니 상태

    // 생성자. producer - promise를 생성하는 쪽
    // const promise = new Promise((resolve, reject) =>{
    //     if(true){// 비동기 처리가 성공했을 시
    //         resolve('result');
    //     }
    //     else {// 비동기 처리 실패 시
    //         reject('failure reason')
    //     }
    // });


    // Consumer 소비자, Promise 객체(의 내부 함수)를 소비하는 쪽    
    // Promise의 후속처리 메서드
    // 1) then
    //      - 두 개의 콜백 함수를 인수로 전달받음
    //      - Promise가 fulfiled된 상태 (resolve 호출) Promise의 처리 결과를 인수로 받음
    //      - Promise가 rejected된 상태 (reject 호출) Promise 의 에러를 인수로 받음
    // const successedPromise = new Promise ((resolve, reject)=>{
    //     resolve('성공했다');
    // }); 
    
    // const faliededPromise = new Promise ((resolve, reject)=>{
    //     reject('실패했다');
    // });
    // faliededPromise.then( 
    //     value => { console.log('val: ', value);}, 
    //     e => { console.log('e: ', e);}
    // );

    // // 2) catch
    // //      - 한 개의 콜백 함수를 인수로 전달받음
    // //      - Promise가 rejected 된 상태의 경우만 호출되며, Promise의 에러를 인수로 받음
    // //      - then과 동일하게 동작함
    // // 
    
    // new Promise((res, rej)=> rej(new Error('실패되었음')))
    // .catch((e)=> { console.log(e);
    // });
    
    
    // // 3) finally
    // //      - 한 개의 콜백 함수를 인수로 전달받음
    // //      - Promise성공 실패 상관없이 호출됨
  
    // new Promise((resolve, reject) => {
    //     // resolve('성공입니다.!');
    //     reject('실패입니다.!');

    // }).finally(() => {
    //     console.log('마지막입니다.');
    // });


    // // Promise를 사용한 예외처리
    // let errorPromise = new Promise((resolve, reject) =>{
    //     setTimeout(()=>{
    //         try{
    //             throw new Error('에러났다!!!!!!!!');
    //             resolve();
    //         }catch(e){
    //             reject(e);
    //         }
    //     },3000)
    // });

    // errorPromise.then(
    //     value => {},
    //     error => {
    //         console.log('에러가 나버렸다');
    //         console.log('에러: ', error)
    //     }
    // );


    //     let testPromise = new Promise((resolve, reject) =>{
    //         setTimeout(()=>{resolve(f1)},1000)
    //     });
    //     testPromise.then(
    //         value => {value()},
    //         error => {}
    //     ).then(
    //         value => {f2()},
    //         error => {}
    //     ).then(
    //         vlaue => {f3()},
    //         error => {}
    //     )

    //     function f1(){
    //         console.log('f1이 실행되었음');
    //     }
    //     function f2(){
    //         console.log('f2이 실행되었음');
    //     }
    //     function f3(){
    //         console.log('f3이 실행되었음');
    //     }


    const data1 = () => new Promise(resolve => setTimeout(()=> resolve(3),3000))
    const data2 = () => new Promise(resolve => setTimeout(()=> resolve(2),2000))
    const data3 = () => new Promise(resolve => setTimeout(()=> resolve(1),1000))
    // const data1 = () => new Promise((_, rej) => setTimeout(()=> rej(3),3000))
    // const data2 = () => new Promise((_, rej) => setTimeout(()=> rej(2),2000))
    // const data3 = () => new Promise((_, rej) => setTimeout(()=> rej(1),1000))
    
    Promise.all([data1(), data2(), data3()]) // 마지막 처리가 끝나면 동시에 출력
    .then(console.log)
    .catch(console.log);
    
    Promise.race([data1(), data2(), data3()]) // 제일 빨리 처리한것만 출력
    .then(console.log)
    .catch(console.log);
    

    setTimeout(() => console.log('10'),0);
    Promise.resolve()
        .then(()=> console.log(20))
        .then(()=> console.log(30));


    const promises = [];
    data1().then( value => {
        promises.push(value);
        return data2()
    })
    .then(value => {
        promises.push(value);
        return data3()
    })
    .then(value => {
        promises.push(value);
        console.log(promises)
    })


</script>
728x90
반응형

'코딩일지 > WEB' 카테고리의 다른 글

js 시계 + 타이머 만들기  (0) 2023.01.03
setTimeout / setInterval 사용 요약  (0) 2023.01.03
addEventListener 활용2  (0) 2023.01.03
addEventListener 활용1  (0) 2023.01.03
js 기초6  (0) 2023.01.03
728x90
반응형
<!DOCTYPE html>
<html lang="ko">
<head>
    <meta charset="UTF-8">
    <meta http-equiv="X-UA-Compatible" content="IE=edge">
    <meta name="viewport" content="width=device-width, initial-scale=1.0">
    <title>Document</title>
</head>
<body>
    
</body>
</html>

<script>


    setTimeout(()=>{
        console.log('첫번째 함수 끝');
        setTimeout(()=>{
            console.log('두번째 함수 끝');
                setTimeout(()=>{
                    console.log('세번째 함수 끝');
                },3000);
        },2000);
    },1000);


    console.log('1');
    setTimeout(() => { console.log('2')},1000);
    console.log('3');
    console.log('최종 delay:', print_delay(print, 2000));
    print_immediateely(print);

    function print_immediateely(func){
        func('immediately');
    }
    
    function print_delay(func, time){
        let delay = 'delay';
        setTimeout(()=>{
            console.log('변하기 전 delay:', delay)
            delay = 30000;
            console.log('변한 후 delay:', delay)
        }, time);
        return delay;
    }

    function print(massage) {
        console.log(massage, '함수실행');
    }


try{
    setTimeout(()=>{
        throw new Error('에러났당');

    },3000);
    //set
}catch(e){
    console.log(e)
    console.log('에러났네..')
}


</script>


728x90
반응형
728x90
반응형

HTML코드

<!DOCTYPE html>
<html lang="ko">
<head>
    <meta charset="UTF-8">
    <meta http-equiv="X-UA-Compatible" content="IE=edge">
    <meta name="viewport" content="width=device-width, initial-scale=1.0">
    <title>전자시계</title>
    <script src="2_Clock.js" defer></script>
</head>
<body>
    <section>
        <div id="click-container">
            <div id="date-now"><i>현재날짜: </i><span></span></div>
            <div id="time-now"><i>현재시간: </i><span></span></div>
        </div>
        <div id="timer-container">
            <div>
                <div id="timer"><span>00:00:00</span></div>
                <button>시작/재시작</button>
                <button>일시정지</button>
                <button>초기화</button>
            </div>
        </div>
    </section>
</body>
</html>
300x250
반응형

js 코드

const dateNow = document.querySelector('#date-now > span'); //현재 날짜 부분
const timeNow = document.querySelector('#time-now > span'); //현재 시간 부분
const timer = document.querySelector('#timer > span'); //타이머 시간 부분
const btns = document.getElementsByTagName('button'); //모든 버튼
const startBtn = btns[0]; //시작버튼
const stopBtn = btns[1];  //중지버튼
const clearBtn = btns[2]; //초기화버튼
const timerStatus = { RUNNING: true, STOP: false }; //enum처럼 상태 객체를 만들기
let nowStatus = timerStatus.STOP; //타이머의 상태를 저장하는 변수 (기본값: STOP)
let timerID = ""; // 1초마다 타이머를 갱신시킴
//0.2초마다 날짜를 갱신

setInterval(date_setting, 200);


// Start 버튼을 눌렀다면
startBtn.onclick = () => {
    //타이머 id를 받아오고, 1초마다 타이머가 시작하도록 함
    nowStatus = timerStatus.RUNNING;
    if(timerID === ""){
        timerID = setInterval(timer_setting, 100);
    }
}

stopBtn.onclick = () => {
    if(timerID !== ""){
        nowStatus = timerStatus.STOP;
    }
}

clearBtn.onclick = () => {
    //timerID가 존재하면(빈문자열이아니면) interval을 중지하고, 그게 아니면 timerID를 그대로(빈문자열로) 둔다
    if(timerID !== ""){
        clearInterval(timerID);
        timerID = ""; //timerID를 초기화한다
        timer.textContent = "00:00:00"; //문자열을 처음으로 돌린다
    }    
}


//현재 날짜 정보를 설정하는 함수
function date_setting(){
    //날짜를 설정하기 위한 Date객체를 생성한다
    const date = new Date();
    //날짜 문자열을 생성
    const dateString = `${date.getFullYear()}-${format_setting(date.getMonth() + 1)}-${format_setting(date.getDate())}`;
    //현재 날짜 부분을 실제 날짜로 변경
    dateNow.textContent = dateString;
    //시간 문자열을 생성
    const timeString = `${format_setting(date.getHours())}:${format_setting(date.getMinutes())}:${format_setting(date.getSeconds())}`;
    timeNow.textContent = timeString;
}

//status: 현재 동작중인지, 정지상태인지 설정하는 상태 변수
function timer_setting(){
    if(nowStatus === timerStatus.STOP){ return; }

    let timerNowString = timer.textContent; //현재 진행된 타이머 시간
    let times = timerNowString.split(':'); // ':'으로 문자열을 나눈다
    let hour = +times[0]; //시
    let min = +times[1]; //분
    let sec = +times[2]; //초
    sec++; //1초 증가시킴
    if(sec >= 60){  //1초 증가했는데 60초가 되었다?
        min++;      //1분 증가시킴
        sec = 0;    //초를 0으로 돌림
    }
    if(min >= 60){  //1분 증가했는데 60분이 되었다?
        hour++;     //1시간 증가시킴
        min = 0;    //분을 0으로 돌림
    }
    if(hour >= 24){ //1시간 증가했는데 24시간이 되었다?
        hour = 0;   //hour를 0으로 돌림
        clearInterval(timerID); //타이머를 중지시킴
    }
    //1초가 지난 현재 타이머 시간을 문자열로 생성
    const timerSting = `${format_setting(hour)}:${format_setting(min)}:${format_setting(sec)}`;
    //타이머 시간 표시 부분에 문자열을 설정
    timer.textContent = timerSting;
}

//날짜나 시간 형식을 00:00:00 형태로 만들어주기 위한 포맷 형식
function format_setting(data){ //data -> 월, 일, 시, 분, 초 중에 하나가 들어옴 (string)
    // data 를 문자열로 바꿧을 때 한 글자면 앞에 0을 붙여서 반환시킨다.
    return data.toString().length < 2 ? '0' + data : data;
}


728x90
반응형

'코딩일지 > WEB' 카테고리의 다른 글

promise  (0) 2023.01.03
setTimeout / setInterval 사용 요약  (0) 2023.01.03
addEventListener 활용2  (0) 2023.01.03
addEventListener 활용1  (0) 2023.01.03
js 기초6  (0) 2023.01.03
728x90
반응형
<!DOCTYPE html>
<html lang="ko">
<head>
    <meta charset="UTF-8">
    <meta http-equiv="X-UA-Compatible" content="IE=edge">
    <meta name="viewport" content="width=device-width, initial-scale=1.0">
    <title>Document</title>
    <script>
        // JS는 기본 싱클 스레드로 동작함(single thread)
        // 따라서, JS는 두 가지 이상의 일(task)를 동시 실행할 수 없음.
        // 타이머 함수 (setTimeout, setInterval) -> JS가 처리하는게 아니라, web 에서 처리함. 따라서 병렬로 작업함
        // setTimeout: 일정시간 후에 한번 전달받은 함수를 실행함(한번동작)
        // setInterval: 일정시간마다 전달받은 함수를 실행(반복동작)
        //          - handler : 내가 실행하고 싶은 함수
        //          - timeout : 일정 시간 이후 실행할 초(ms, 1/1000)
        //                  - 값을 지정하지 않을 시, 기본값 0이 지정됨 최소4ms지난 후 실행됨.
        //          - ...arguments : 실행하고 싶은 함수에 전달할 인자들을 순서대록 작성


        // 
        const id = setTimeout(print, 1000, '실행했어', 300);
        clearTimeout(id);//작업 설정한 id를 전달하여 예약된 작업을 취소

        setTimeout(() =>{
            console.log('함수가실행됬다')
        },2000);

        function print(message, number){
            console.log(message)
            console.log(number)
        }


        const intwervalId = setInterval(print2, 500);
        setTimeout(()=>{
            clearInterval(intwervalId)

        }, 1500);

        function print2(){
            console.log('반복작업1');
        };

        
    </script>
</head>
<body>
    
</body>
</html>
728x90
반응형

'코딩일지 > WEB' 카테고리의 다른 글

promise  (0) 2023.01.03
js 시계 + 타이머 만들기  (0) 2023.01.03
addEventListener 활용2  (0) 2023.01.03
addEventListener 활용1  (0) 2023.01.03
js 기초6  (0) 2023.01.03
728x90
반응형
<!DOCTYPE html>
<html lang="ko">
<head>
    <meta charset="UTF-8">
    <meta http-equiv="X-UA-Compatible" content="IE=edge">
    <meta name="viewport" content="width=device-width, initial-scale=1.0">
    <title>Document</title>
    <style>
        #text_container{
            background-color: beige;
        }
    </style>
</head>
<body>
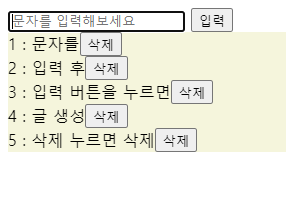
    <div id="input_container">
        <input type="text" placeholder="문자를 입력해보세요">
        <button>입력</button>
    </div>
    <div id="text_container">
        
    </div>


    <script>
        // 버튼을 눌렀을 시, 혹은 엔터를 입력했을 시 텍스트 div을 넣어줄부모 컨테이너
        let textContainer = document.getElementById('text_container');
        //입력 버튼을 가져옴
        let inputButton = document.querySelector('button');
        //입력 태그(텍스트창)
        const inputTag = document.querySelector('input');
        // 입력 버튼을 클릭했을 떄 실행할 동작을 설정
        inputButton.addEventListener('click', appendText);
        
        //키가 눌렸다가 때졌을 경우 이벤트 등록
        inputTag.onkeyup = e => {
            // 눌려진 키가 Enter가 아니라면
            if(e.key !== 'Enter'){
                return; //함수 종료
            }
            appendText(); //자식으로 텍스트 div를 추가한다
        }
        
        
        // 부모 컨테이너 div 에 자식으로서 텍스트를 추가해주는 함수
        function appendText(){
            // 현재 부모 컨테이너의 자식 개수를 받아온다.
            const chileCount = textContainer.childElementCount;
            let div = document.createElement('div');//div 태그를 가진 노드 생성
            div.className = '내용';
            // text설정한다 -> '행번호 : inputTag의 내용'
            // 따라서 -> 'childCount + 1 : inputTag.value'
            div.textContent = `${chileCount + 1} : ${inputTag.value}`;//해당 div의 내용을 설정한다.
            textContainer.appendChild(div);
            //현재 줄에 넣을 삭제버튼 생성
            const removeBtn = document.createElement('button');
            removeBtn.innerText = '삭제';
            div.appendChild(removeBtn);
            //삭제 버튼을 눌렀을 때, div 를 제거함
            removeBtn.addEventListener('click', () =>{
                // 현재 div의 번호를 받아온다.
                let divNumber = +div.textContent.split(':')[0];
                console.log(divNumber)
                
                // for (let index = divNumber; index < divChildren.length; index++) {
                //     const element = array[index];
                    
                // }
                
                // for (let index = divNumber + 1; index < divChildren.length; index++) {
                //     // 현재 index의 div가 가지고있는 글자를 전부 가져온다
                //     let content = divChildren.item(index).innerHTML;
                //     divChildren.item(index).textContainer = `${index - 1}: ${content.split(':')[1]}`; // 텍스트 내용 부분만 가져온다.(번호뺴고)                    
                // }


                // div를 삭제한다.
                div.remove();
            });    
            inputTag.value = '';// input태그 내용을 초기화  
        } 


    </script>
</body>
</html>
300x250


실행창

반응형


728x90
반응형

'코딩일지 > WEB' 카테고리의 다른 글

js 시계 + 타이머 만들기  (0) 2023.01.03
setTimeout / setInterval 사용 요약  (0) 2023.01.03
addEventListener 활용1  (0) 2023.01.03
js 기초6  (0) 2023.01.03
js 기초5  (0) 2023.01.01
728x90
반응형
<!DOCTYPE html>
<html lang="ko">
<head>
    <meta charset="UTF-8">
    <meta http-equiv="X-UA-Compatible" content="IE=edge">
    <meta name="viewport" content="width=device-width, initial-scale=1.0">
    <title>Document</title>
    <script src="inputEvent.js" defer></script>
    
    <style>
        .box{
            width: 100px;
            height: 100px;
            background-color: #FFF700;
            border: 5px solid red;
            cursor : pointer;
        }
    </style>

</head>
<body>
    <div class="box"></div>
</body>
</html>
300x250
반응형
const box = document.querySelector('.box');
const initMousPos = {x:0, y:0};//리터럴 객체생성방법 // 마우스 드래그 시작 지점의 위치
// functioninitMouserPos(){
//     this.x = 0;
//     this.y = 0;
// }
const offset = {x : 0, y : 0}; //이동할 거리
// mousemove시 실행할 move함수
const move = function(event){
    // 이동할 거리 = 현재 (드래그 진행 시점)의 마우스 위치 - (드래그 시작 지점의 마우스 위치)
    offset.x = event.clientX - initMousPos.x;
    offset.y = event.clientY - initMousPos.y;
    // translate3d는 GPU를 사용하기 떄문에 top, left 속성을 변경하는 것보다 처리 속도가 빠름
    // top, left는 레이아웃에 영햘을 줌
    box.style.transform = `translate3d(${offset.x}px, ${offset.y}px,0)`;
};
// mousedown : 마우스가 눌렸다(클릭아님)
// mousedown 이벤트 발생 시, 드래그 시작 시점의 마우스 포인터 좌표(event.clientX 와 clientY)를 저장해 둡니다.
// 
box.addEventListener('mousedown', event =>{
    initMousPos.x = event.clientX - offset.x;
    initMousPos.y = event.clientY - offset.y;
    // mousedown 이벤트가 발생한 상태에서 mousemove 이벤트가 발생하면 box를 이동시키는 move를 실행
    document.addEventListener('mousemove', move);
});
// mouseup : 마우스를 떄는 이벤트(클릭 아님)가 발생하면 move 이벤트를 하면 안되므로 제거해준다
document.addEventListener('mouseup', () =>{
    document.removeEventListener('mousemove', move);
});


마우스로 클릭 후 이동 가능한 네모난 상자만들기

728x90
반응형

'코딩일지 > WEB' 카테고리의 다른 글

setTimeout / setInterval 사용 요약  (0) 2023.01.03
addEventListener 활용2  (0) 2023.01.03
js 기초6  (0) 2023.01.03
js 기초5  (0) 2023.01.01
js 정규식 연습1  (0) 2023.01.01

+ Recent posts

728x90
반응형
">